Windows 10 Information
I started Windows 10 Information when I taught a course about Windows 10 at the McGrath Computer Learning Center, Aiken, SC. (Note: In 2021 McGrath merged with the Academy for Lifelong Learning to form the Center for Lifelong Learning.) As a result, some information in the Questions & Answers section talks about what we did "in class." The Tips may be useful to a new computer user.
Take note: Some of this information goes back to earlier versions of Windows 10 and may have changed. Some of the links herein may also be dead as the page was started in 2015.
Jump to:
Updated:Breaking News
February 16, 2019. I am no longer updating the primary content of this page. I'll leave it posted for the information it contains.
Questions & Answers
-
Question: How do I change the settings so that when I save a file (document, picture, spreadsheet, etc.), it is saved by default into a folder on my computer and not on OneDrive (Microsoft's storage on the Internet, a/k/a the cloud)?
Answer: OneDrive is built into Windows 10. Unless you turn it off during setup, OneDrive is also turned on by default. This means when you save a file, it will be saved to a OneDrive folder unless you explicitly change the location in the Save File dialog box that pops up when you save a file from within an app. You can change this behavior using OneDrive's settings.
Right click the OneDrive icon (which looks like a cloud) on the taskbar or within the hidden icons area (display the hidden icons by clicking the upward-pointing caret on the taskbar). Click Settings on the menu that pops up. Click the "Auto Save" tab in the dialog box. There are three pick lists in the dialog box labeled Desktop, Documents, and Pictures. The pick list button will display OneDrive unless you changed it during Windows 10 setup. Click the downward-pointing caret on the right side of the pick list for the category of files you want to change. Select "This PC" for the categories for which you do not want to use OneDrive as the default save location. Click OK.
If you decide you do not want to use OneDrive at all, you can unlink your PC from OneDrive on the Internet (cloud). First, make sure that you have a backup copy of all the files on OneDrive. Go to the OneDrive Settings as described in the paragraph above. Click the link entitled "Unlink this PC." On the box that pops up, click "Unlink account."
As I mentioned in class, the Fall Creators Update (the current major update of Windows 10, which you likely have on your computer), changes the way OneDrive works. I am still researching this and will update this answer when I understand the new process. If you want to learn more about OneDrive, a good place is Microsoft's help page for OneDrive.
-
Question: How do I change the email program that pops up when I click on an email address in my web browser?
Answer: This depends first on whether your normal email client (the program you use to send and receive emails) is a web mail client (such as Gmail, Yahoo mail, Bellsouth web mail, etc.) or a local, desktop client (such as Thunderbird, Mailbird, or Outlook, etc.). (The Outlook I'm referring to in that list is the program that comes with Office, not Microsoft's web mail outlook.com.) If you use web mail, you usually set the default client using the settings for your browser (or an add-on extension for your browser). If you use a desktop client, you set the default using Control Panel and Settings in Windows 10. Go to this article to learn how to set the default email you are using.
-
Question: How do I change my account type that I use to login to Windows from Administrator to Standard (or vice versa)?
Answer: This is the question that I stumbled over in the class of 1/22/18. I knew how to do it from within Control Panel, but I felt that you should be able to do from within the Settings app. It turns out that the problem was that we only have one account on the computers in the Learning Center and that is an Administrator's account. You are required to have at least one Administrator's account on a Windows computer. If you have only one account on the computer (as we do), you cannot change the account type.
So let's look at how you change the account type when you have more than one account on the computer. First of all, you can only make this change from an Administrator's account. Open the Settings app (Windows key + I). Click Accounts. Click "Family & other people" on left side of page. Scroll down (if necessary) to the "Other people" section. If you have more than one account on this computer, the other accounts will be listed in this section. Click one of the account names. Click the button labeled "Change account type."
-
Question: What do I do if I've lost my Windows login password?
Answer: This may be an easy fix if you are using a Microsoft Account (rather than a local account). With a Microsoft Account, you can reset your password online.
With a local account, it's a little harder. If you can still get into your computer with a PIN or fingerprint reader, you can create a new user account with a new password. However, you then have to manually copy your personal files from the old account to the new one. This means your new account needs to be an Administrator's account so be sure to select that type of account when creating it.
There is software available on the Internet that will allow you to reset or recover your Windows password. I have not used any of these and that's the kind of activity that seems ripe for downloading a program that would allow a hacker into your computer, so I won't recommend one. Instead, call a good computer repair center and have them come and reset your password. They will have the appropriate software to do so.
You can always reinstall Windows. There is a real risk of losing your personal files in this case. That means you will have to rely on your backup (you do have a backup of your personal files, right?). You can create a bootable flash drive to start your computer and from which to reinstall Windows by using the Media Creation Tool on Microsoft's web site.
All of the anxiety and problems of losing a Windows password may be avoided by taking an action while you still know it. You can create a password reset disk or flash drive. As Step 1. at that link says, this will not work with a Microsoft Account, for which you should use the link in the first paragraph above.
-
Question: How do you search for a file based on the file date stamp.
Answer: In File Explorer, navigate to the folder in which you want to search. Click in the search box in the upper right area of the window. A tab will be added to the ribbon labeled Search Tools. (If your ribbon is not displayed, click that tab.) The search ribbon will open showing options for your search in the Refine group. Click Date Modified and select a date. If you want more control over the date for which to search, in the search box type "datemodified:" (without the quotes). A window will pop up with a calendar allowing you to pick the exact date for which to search.
You can find a good summary of searching here and an article specific to searching by date here.
-
Question: We discussed the need to keep a current backup, that is, a second copy stored on a drive outside your computer, of your personal files, those files that you create or receive from friends, relatives, or co-workers. The purpose of a backup is to be able to restore your files should you be the victim of ransomware or simply a failure of the primary hard disk in your computer. During that discussion, someone asked how you start your computer if the hard drive has failed.
Answer: The answer is you need to prepare for hard drive failure before it actually happens. You do this by creating a recovery flash drive in Windows 10. You will need an empty flash drive that has a capacity of 8 gigabytes (GB) or more. Then take the following steps:
- Click the Start button. Type "create recovery" (without the quote marks) and press the Enter key. (You may be asked to enter the password of an administrator account.) A dialog box entitled Recovery Drive will open.
- Make sure the checkbox in front of "Backup system files to the recovery drive" is checked. Click the Next button. Windows will take a few minutes to prepare for creating the recovery flash drive so be patient.
- If you have not connected (that is, plugged it in to a USB port) a flash drive, you will be prompted to do so. Then you will have to click on the flash drive's name. Click the Next button.
-
The dialog box will now warn you that everything on the
flash drive will be deleted. Click the Create button to
transfer the Windows 10 files to the flash drive. This will
take some time, perhaps 5 to 20 minutes.
After the files are transferred, click the Finish button. You have now created your recovery flash drive.
You can boot (start) your computer from the flash drive. Once booted, the flash drive will guide you through the choices available for restoring your computer. You can go to this Microsoft article about creating a recovery drive for more information and to see screenshots that show the above steps.
-
Question: When I try to uninstall some of the preinstalled apps that come with Windows 10, such as Xbox, the "uninstall" button is grayed out (inactive). How can I uninstall these apps?
Answer: Microsoft does not make it easy to uninstall some of the apps in Windows 10. In fact, some, such as Cortana, cannot be uninstalled. Other apps can be uninstalled, but not from the All Apps list. Someone asked how to uninstall Xbox. This article explains how to uninstall the Windows 10 apps. In the article, under the heading "Use Powershell to Uninstall Built-in Apps," when the article says, "Agree to the UAC prompt," you may have to enter your Windows login password if you are logged in under a standard account.
-
Question: How does the size of Windows 10 compare to earlier versions?
Answer: Windows 10 is smaller than both Windows 7 or 8.1 and it boots faster. Take a look at this article, especially the graphs.
-
Question: Is Windows Defender that comes with Windows 10 the only anti-malware protection you need?
Answer: UPDATE: Most of the information on this page has not been updated because the answer did not change substantially. This answer did. As of June 2020, Windows Defender is now one of the top-rated products for protecting your computer, although there are still those that score higher (see links below). Here was the original answer (links in original answer have been updated also): Windows Defender is intended to be basic protection. It may be good enough if you are careful about which web pages you go to and how you respond to links in emails. If you want more protection than offered by Defender, there are many third party products available, many of which are free. A firm named AV-Comparatives conducts tests of anti-malware products. You can find a summary of their most recent tests in this chart. You can go to the AV-Comparatives web site for more information. Another similar test company is AV-Test. You can find AV-Test's summary chart of Windows 10 test results here.
-
Question: How do I check my computer to see if any malware has been added to it?
Answer: Run a scan using the free program Malwarebytes Anti-malware. A good article on how to run Malwarebytes can be found at Bleeping Computer. Note: while Bleeping Computer is a safe site, the ads on it, or any other web site, may not be safe. Do not click on anything in an ad, such as the one that will appear at the top of the page when you go to this link, unless you know it to be safe.
-
Question: How do I add my Bellsouth/AT&T or AtlanticBroadband/GforceCable email account to the Windows 10 Mail app?
Answer: We are covering these email providers because so many of our students use them. Some providers (Outlook, Gmail (Google), iCloud, and Yahoo) are listed in the window where you add an account to Windows 10 mail. Adding one of these accounts requires only that you enter your email address and password. Setup from there is automatic. However, other email providers must be added as a POP or IMAP account. This link to Microsoft help covers the basics of getting to the Manage Accounts window where you add an account.
For email providers like Bellsouth or AtlanticBB, first try entering your email address and password and clicking Sign In. Sometimes that works. Other times, you will get a message that Mail could not find the account. There will be a button labeled Try Again. You must click this button 2 more times before it will switch to Advanced. Click the Advanced button to enter the account information manually.
The key information you need is the incoming and outgoing mail server names. These names will usually be different for a POP3 or IMAP4 account type. POP3 and IMAP4 are different ways of accessing your email inbox. POP3 is simpler but not as secure as IMAP4. You should try to set up your account using IMAP4 first. If that does not work, try to set it up using POP3.
For Bellsouth/AT&T: IMAP4: Incoming email server: imap.mail.att.net Outgoing (SMTP) email server: smtp.mail.att.net POP3: Incoming email server: inbound.att.net Outgoing (SMTP) email server: outbound.att.net For AtlanticBroadband/GforceCable: IMAP4: Incoming email server: mail.atlanticbb.net Outgoing (SMTP) email server: mail.atlanticbb.net POP3: Incoming email server: pop.atlanticbb.net Outgoing (SMTP) email server: smtp.atlanticbb.net Uncheck the box "Outgoing server requires authentication." After you enter the information manually, the Sign In button will be active. Click it, then click Done and your account should be set up. You may want to go back into the settings and change how frequently your account syncs, that is, how often it downloads new mail to your Inbox.
-
Question: Some of my Windows 10 apps (Mail, Photos, etc.) do not work correctly. How can I re-install them to make sure the app files are up to date and not corrupted?
Answer: The easy way is to just re-install all of them following this procedure. Press the Windows key. Type "powershell" (without the quotes). Right click on the Powershell search result and click "Run as Administrator" on the menu. Powershell will open in a new window. Type this command at the > prompt (this will all be on one line in the Powershell window, i.e., there are no carriage returns in the command) or cut-and-paste it from here:
Get-AppxPackage -AllUsers| Foreach {Add-AppxPackage -DisableDevelopmentMode -Register “$($_.InstallLocation)\AppXManifest.xml”}Press Enter. Ignore any error messages that pop up. It make take a few minutes, but all your Windows 10 apps will be re-installed. Restart your computer to ensure that the changes are made effective. This link provides more detail on this procedure as well as how to uninstall Windows 10 apps that do not have an uninstall option in the All Apps list.
-
Question: How do I setup a slideshow of pictures on my desktop background that will change pictures?
Answer: Go to Settings, select the Personalization category, and click the Background menu item on the left side of the screen. In the settings on the right side of the screen, click the downward-pointing arrow in the pick list box below the word Background and select Slideshow from the pick list. Click Browse to select the folder that contains the pictures you want to include (you may want to create a special folder just for this purpose and copy pictures to include into it). Click the pick list symbol below "Change picture every" and select the time each picture will be displayed. Close the Settings app and you are done.
-
Question: How do I put a shortcut in a tile on the Start Menu that lets me go directly to a web page by clicking on the tile?
Answer: The easy way is to use the new Edge browser. In Edge, go to the web page that you want to create a link to. After the page finishes loading, click the ellipsis (the three dots) in the upper right corner of the Edge window. A menu opens. Click "Pin this page to Start." You're done. Click the Start button to open the Start menu and drag the tile for the web page to the position you want it.
You can add a tile for a web page from other web browsers, but it's a lot more complicated. To see how to do that go to this page. -
Question: Can you eliminate the many ads that pop up in your web browser.
Answer: Those ads are what pay for all the free content on the Internet, all that help you can get for just about anything. I personally don't use an ad blocker. Consequently, I don't know much about installing and using them. Some research shows that one of the oldest that has a good reputation for being effective is Adblock Plus. This is a browser extension (or add-in) for all the major browsers.
-
Question: How do I print the information on the Settings>System>About page, which shows the version of Windows you have, the amount of memory installed, the processor you are using, whether your computer and Windows is 32-bit or 64-bit, and other information.
Answer: I could not find a way to print from that particular screen. You can, however, print that same information through a different route. Do the following:
- press the Windows key and the R key simultaneously to bring up the Run input box.
- in the input box, type "msinfo32" (without the quotes) and press Enter. This will bring up the System Information window (not the same as the one in Settings that we looked at in class).
- In the System Information window, use the menu option File | Print to print the information.
-
Question: How do I print or save what is on the screen so that I can send you the error messages that I am getting?
Answer: You can do a screenshot using Windows 10. Simultaneously press the Windows key (located in the lower left corner of the keyboard between the Ctrl and Alt keys) and the Print Screen key (usually in upper right of keyboard but different manufactures put it in different places; it will have Print Screen, or PrtScn, or PrtSc, or just PS, on the key). You may see your screen flash or you may see nothing. However, a picture of your screen has been saved as a file in your Pictures folder, in a subfolder named Screenshots. The file will have a name like Screenshot(1).png. You can now attach that file to an email to me that describes the problem you are having. That will help me give you an answer to your problem.
-
Question: My Windows 7 computer takes a long time to start up. Before I upgrade to Windows 10, I want to remove some programs that are automatically loaded when I turn my computer on. How do I do that?
Answer: For Windows 7, run a program on your computer named msconfig. Press the Windows key and R keys together to bring up the Run box. Type "msconfig" (without the quote marks) in the box and press Enter. The System Configuration dialog box as shown below will open. Click on the tab along the top of the box labeled Startup to display a list of all the programs that are loaded when you turn your computer on.
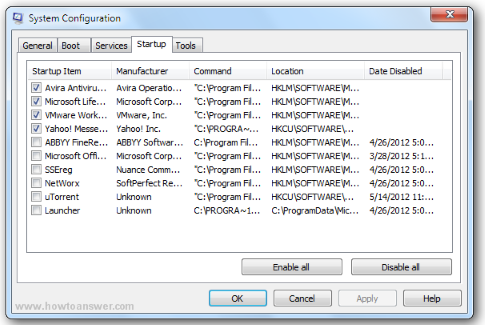
It's a little hard to figure out what each program is, but looking at the Location column (which shows the path to the program's executable file) may help. You can uncheck most of these Startup Items to remove them from the list. Most of them load at startup only to make the program a little faster to open when you launch it. Even if you remove it from this list, it will still open when you use it. That said, you do not want to remove programs like your anti-virus program that needs to load when you turn on your computer to ensure you are protected.
Go to this article which has an explanation in more detail about how to remove start-up programs from both Windows 7 and Windows 8. The information for Windows 8 is also applicable to Windows 10.
-
Question: How do you change the email address (also called an alias) you use to sign in to your Microsoft Account when you start your computer.
Answer: Follow these steps:
- Open the Settings app (click Start Button, click Settings).
- Click Accounts.
- Make sure “Your email and accounts” is selected (highlighted) in left menu pane.
- In right pane, find the link that says “Manage my Microsoft Account” and click the link.
- This will open your default web browser and take you to a Microsoft web page from which you manage your Microsoft Account. If there is a button that says “Sign in,” click it. (You may be taken directly to a sign-in page instead of the page with the Sign-in button.) Sign in with your current email address and password.
- In the blue bar along the top of the page, click “Your Info.”
- Click the link labeled “Manage your sign-in email or phone number.”
- You may be prompted to enter your password again or to request a code that Microsoft will send to the email address or cell phone number listed in your account as security information. This lets Microsoft know the request is coming from you.
- Note the list of Account Aliases (if you have only one address associated with the account, there will not be a list, just the one email address. If there is more than one alias, one of them will be labeled “primary alias.”
- If the address you want to use in the future is not listed, click the “Add email” link.
- Click the radio button in front of “Add an existing email address as a Microsoft account alias.”
- Type the email address you want to use to sign in to Windows in the future in the box.
- Click the “Add alias” button. You will be returned to the “Manage your account aliases” screen and the new email address will have been added to the list of aliases.
- If this is a new address for your Microsoft Account, you have to prove to Microsoft that you own the address. To the right of the alias you added, click Verify. An box will open for you to click “Send an email.” Microsoft will send a message to that email address to get confirmation. When you receive the verification email, click the link provided to verify that you own the account. You may have to sign in again just to prove it’s still you.
- After you verify the email address, while still on the “Manage your account aliases” screen, click the “Make primary” link to the right of the new email address you want to use. You have now made this the primary address associated with your Microsoft Account.
Wait a few days to make sure that everything is working right. Then, if you want to, you can remove the old email address you no longer want to use. Follow steps 1 through 7 above to go back to the “Manage your account aliases” screen. To remove an email address that you no longer use, select “Remove” next to that alias on the “Manage your account aliases” page, and then follow the instructions provided.
Keyboard Shortcuts
Below is a list of shortcuts useful for Windows 10.
- WinKey+E – open new instance of File Explorer.
- WinKey+I – open Settings.
- WinKey+S – launch Cortana (search).
- WinKey+X – open power menu.
- WinKey+Tab – open Task View.
- WinKey+PrtSc – take picture of screen, save it in Pictures/Screenshots.
You can find a complete list of keyboard shortcuts at this web page.
Links
Below is a list of links useful for Windows 10.
Overall Questions and Answers About Windows 10 - An article written by Ed Bott (whom I consider the most reliable of all the Windows "experts") that addresses common questions about Windows 10, from upgrading to what's new. Bott writes straightforwardly, but there are a few technical concepts in this article. Bott frequently updates this article for changes in Windows 10.
Complete version history of Windows 10 - From Wikipedia. Gives the timeline and content of all the major updates.
Why 64-bit Windows is Better - I usually spend a few minutes in class talking about the difference between 32-bit and 64-bit processors and Windows. Now the HowToGeek tells you more about why you should use 64-bit if you can.
Privacy Concerns? - A clear, straight-forward article about privacy settings in Windows 10.
Get Started - An article from the support wiki on the Microsoft site. This article provides links to resources on the Microsoft site to help with learning Windows 10. Comprehensive and complete.
Index of Microsoft Help for Windows 10 - The first place you should go to search for help with Windows 10 on the Internet.
Control Your Privacy - There is a lot written about the information sent to Microsoft by Windows 10. You, however, have control of most of it. This article takes you through the Privacy settings and tells you what each of them means and the benefit of turning it off or leaving it on.
Review of Windows 10 - General discussion of Windows 10 with links to other pages that provide useful information.
Basics of Using the Computer - This is not specific to Windows 10, and it is somewhat dated (2008), but it's a good list of some basic tips that everyone who uses a computer at home ought to be aware of.
Zen and the Art of File and Folder Organization - This is not specific to Windows 10, but it may be the most complete discussion of setting up your file system that I've seen. I'm not saying this is the way you should organize your files, but it is a complete system that you may want to take some points from.
Tips
Tips on using Windows 10. Also has some basic computer tips that apply to almost all desktops and laptops, whether they are running Windows, macOS, Linux, or Unix.
- In almost any program, app, or operating system, you can select one word by double-clicking on it with the mouse pointer positioned over the word.
- The universal eraser to undo you last action, whether it's typing, mouse click, a command, is to press the Ctrl key and the letter Z simultaneously (that key combination applies to Windows; on a Mac, it's Command and Z).
- For versions of Windows after the Anniversary Update (August 2016), it is no longer easy to turn off Cortana, the personal assistant. You can learn how to turn off Cortana. Be sure to heed the warnings in the article about setting a restore point and backing up both the registry and your personal files before you do this.
- Sometimes you have to double click a screen element (icon or link or file/folder name) to open it, sometimes a single click will do. How do you know which is required? If your mouse pointer is an arrow, usually a double click is required. If the pointer is a hand, a single click will suffice.
- If a friend tells you that she received an email from you that invited her to invest is some securities, it is likely that your email account has been hacked. Immediately changing the password to your email account will usually take care of this. Your new password should be a strong one of at least 12 characters. Go to my blog entry on Online Security for more information on strong passwords and other ways to protect yourself online.